Day1!
Example files
https://github.com/chimanaco/td-workshop-vivo201902
Day1 > Day1.toe
Agenda for today
- Introduction
- Basic structure of TouchDesginer
- How to work with TouchDesigner
- Video playback
- Create filters
- User interface
- Output
- Learning resources
- Open lab time
What is TouchDesigner?
TouchDesigner is a node based visual programming language environment widely used for live shows, projection mapping, experimental design, interactive installation and so on.
Each node, or Operator in TouchDesigner, performs a specific, small, and granular action. However, you can create something very complicated using these small building blocks. Unlike traditional programming, you can program visually by wiring these small blocks together.
One powerful feature of TouchDesigner is that everything works in real-time. As soon as you connect its nodes, you will see the result immediately without having to compile code or render an animation. This is a really powerful and fun part of TouchDesigner.
Sometimes, you might need to spend a lot of time making what you want because it might not be something out of the box. However, it's really fun building your own tools!
In addition to this node based programming, if you are good at GLSL, Python and C++, the possibilities are infinite. I would say you can make almost anything because TouchDesigner allows you to customize your projects with those languages.
Check out Derivative to see what people have built with TouchDesigner. The articles might give you some inspiration and an idea of what is possible with TouchDesigner.
What we will learn in this workshop
This workshop is going to be an introduction to TouchDesigner and we will focus on learning the basic structure of the software and go through some useful tools that you might use for your own project.
I will also give you useful learning resources in case you want to learn more after the workshop. We also have open lab time in this workshop, so please don't hesitate to communicate with me if you have any questions. I also encourage you to ask a question if I didn't explain something well, or if you want a little bit more clarification. If you have a question somebody else is probably thinking the same thing.
How it works
First, I'm going to speak about the structure of a TouchDesigner project and how TouchDesginer works.
Operators
There are five families of operators we can use, whcich are TOP, CHOP, SOP, MAT, DAT and COMP. Using these operators we will build our application.
There are five families of operators we can use, which are TOP, CHOP, SOP, MAT and DAT Another family is COMP, which stands for component. We will build our application using these operators.

We will work mainly with TOPs and CHOPs on Day1. CHOPs, SOPs, MATs, COMPs on Day2.
Network Editor
This is our workspace. We call this the Network Editor. Let's see how we move around the editor.
Use the left mouse button to drag around. You can move around the space. It is an infinite canvas so you can keep on moving and building your network.
You can zoom by holding down the middle mouse button and moving the mouse left and right. If you don't have a middle mouse button, you can use the alt key (option on a Mac) and right mouse button which will substitute for the middle mouse button.
To move an operator, you can just select one with the left mouse button and drag it. You can select multiple operators by holding down the shift key, selecting another one and then dragging them around. You can also do box-selecting with the left mouse button by holding down shift key. The right mouse button also gives you a box select.
In a TouchDesigner network, the data flows from left to right. If you see the wires connecting operators are animated, that means there is some data flowing. If you don't see animated wires and things aren't working for you, the timeline might be paused. This happens a lot because the space bar is the hotkey for pausing the timeline. If you happen to hit the space bar you'll pause your timeline and you will see data is not travelling through the wires and things won't be updating for you. If something is not working for you, double check that the timeline is playing. Just click the play button on the bottom or the space bar again, that should get it working.
There is also a way of scrolling in and out of components with the scroll wheel. If you scroll out with your scroll wheel, eventually you're going to go out of that component to an upper level. You can also use the scroll wheel to dive into the component. Just put the mouse on the component and scroll in and you will eventually zoom into the network inside of that component. If you double-click on a component, that will take you directly inside that component.
There are keyboard shortcuts for these. Press the U key if you want to go to an upper level and the I key to go to an inner level.
If you press the H key, it will “home” your network and you'll see your entire network at once. If you press the H key with shift, it will home your network with a focus on your selected operator.
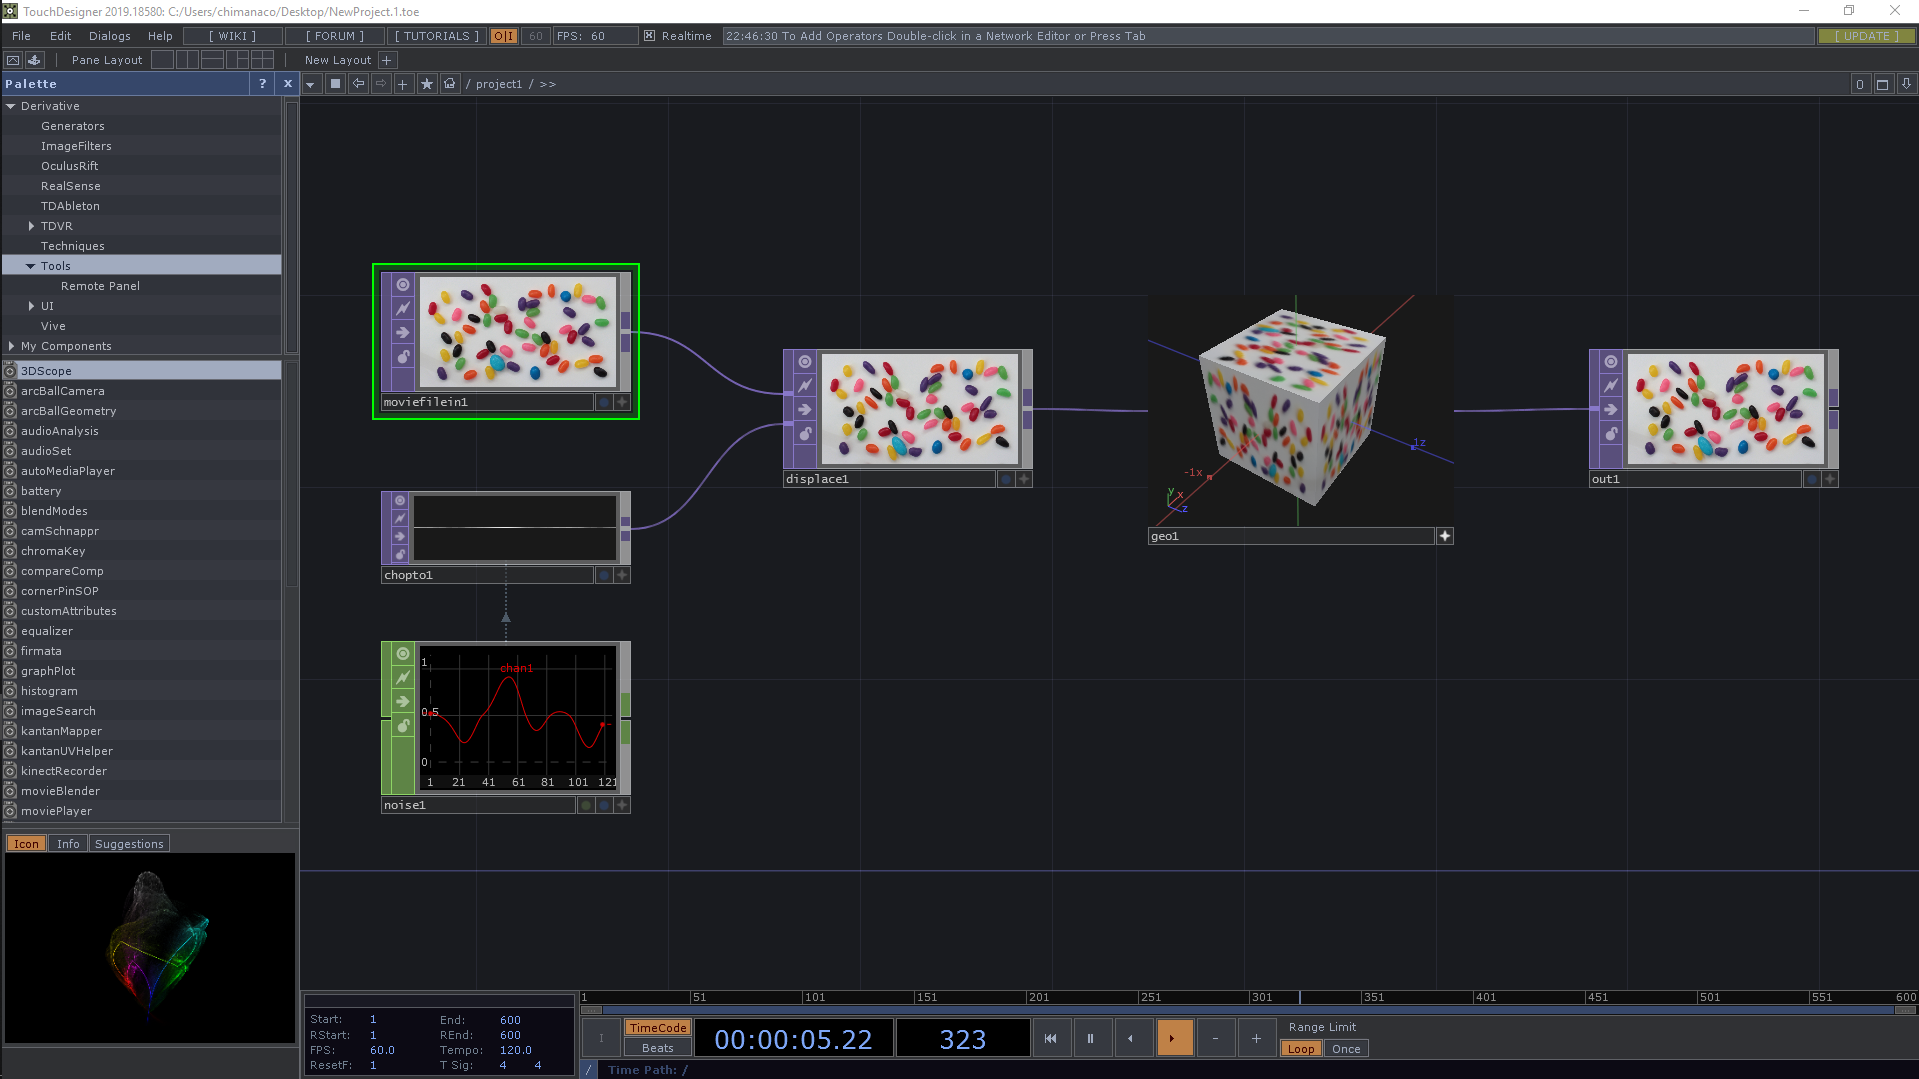
Add our first operator!
Remove all default operators
Before playing around, let's delete all operators in the Network Editor and add a brand new operator. We're going to use it to add video. To select all operators, you can use the Ctrl + A keys and hit the Del key to delete them.
Add a Movie File In TOP
To add a new operator, you can open the OP Create Dialog by double-clicking anywhere in the Network Editor's open space. That'll show you a bunch of different operators. Also the tab key is a shortcut to bringing up the OP Create Dialog. The operators are separated into different families. Each family deals with different types of data. You can change family tabs by hitting the tab key once the dialog is open.
There are lots of operators and sometimes it's hard to find what you'd like to add. When you open the OP Create Dialog you'll find a litte search field at the top. If you type what you are looking for, it just highlights that. We want to use an operator called Movie File In TOP to play our video, so let's type Movie and Movie File In TOP should be highlighted. If you find it, click and drag it to the network.
Now we have a Movie File In TOP in our network editor. This is the operator for loading an image or playing a movie. Whenever you select an operator, you should see parameters for that operator highlighted at the top right of the Network Editor in the Parameter window. If you don't see these parameters on the right, the hotkey for this is P and you can just toggle it on and off.
In the Movie File In TOP, click the plus button to the far right of File. This will open a file browser on your OS. Find your video file and select it. It should start playing your video!
If you ever see a warning flag (yellow triangle) or even worse an error flag (red circle) on an operator, middle mouse click on it and you can read the details of the warning or error. In the case of the Movie File In TOP, you often find a message about the resolution. This popup is helpful for debugging when there's something not working.
Create simple filters
Transform TOP
Let's connect another operator to our video. I would like to introduce the Transform TOP that is used for 2D transformation like translate, scale and rotate.
Connect and disconnect operators
If you left mouse button on the output connector of an operator and you get close to a valid input connector on another operator, it will kind of have a little magnetic snap and you can connect it.
Instead of adding a new operator and then connecting it, you can right-click on the output of any operator, select a node from the Op Create Dialog and it'll be automatically wired. You can also insert an operator between operators by right-clicking the wire between them. It will bring up the little menu and you simply choose Insert operator.
You can also disconnect operators if you choose Disconnect on the little menu. Another way to do that is clicking on an input and take the wire out into space and just click somewhere and it'll disconnect.
Example1: /project1/Transform
Add Transform TOP from the dialog and drop it down. You should see a parameters window on the top right. Let's take a look at translate. The left is for x and the right for y. 0 is center. The range for xy here is -0.5 and 0.5.
Value ladder
You can type in any number you want but it's not an interactive way of working. TouchDesigner has something called a value ladder when you're working with parameters. If you hold down the left mouse button on a numeric parameter, you will see a dialog popup with 5 or 3 different numbers, each using different increments. Whichever increment you choose, it's going to adjust the parameter by that increment. Let's say we just go with .1 in the middle. Once I Select the increment, if I start moving left and right it's going to adjust the parameter in .1 increments. If we like to go down to .01 and go left and right now we're going to adjust it in .01 increments. This is the way that we can find a sweet spot with parameters or quickly adjust any numeric parameter.
Another trick with adjusting parameters is that sometimes you see two or three parameters and you want to adjust all at the same time by the same amount. Instead of adjusting both separately, if you hold down the left mouse button on the name itself, you can adjust both of them at the same time. This is handy for scaling in XY at the same time. We can also use this for 3D, for example, scaling a sphere in all XYZ.
A Transform TOP can also create a pattern easily. Go to the Tile tab and choose Repeat for extend on the parameter dialog. Head back to the Transform tab and try tweaking values on Scale.
Example2: /project1/Transform_Python
We can use Python expression on parameters. To make a simple animation, we often use absolute time. We can express seconds and frames as below.
absTime.seconds
absTime.frame
These are TouchDesigner specific, but we can also use lots of python features. For example, a mathematical function in python.
math.cos(absTime.seconds * 2) * 0.25
math.sin(absTime.seconds * 2) * 0.25
Example3: /project1/Transform_CHOP
So far we have only seen some TOPs. But as we saw in the beginning, TouchDesigner has different families of operators. Here I would like to add a CHOP to make an interaction with a TOP. However, operators in the same family can connect with their input and output but operators from different families can't connect in the same way. So how can we do this?
Let's add a CHOP called Constant CHOP where we save constant values. We have a channel named chan1 in the CHOP and I want to put this channel to a parameter on a Transform TOP.
Select your Transform TOP and make sure the parameters dialog is on the top right. Go to the Constant CHOP named constant1 and make the Viewer Active by clicking the plus sign on the bottom right. When the viewer is active and it's ready to go, you see it turns green. Drag and drop it onto the parameter and select CHOP Reference.
Now they are connected. If it worked, it'll turn light blue, as we saw when we used a python expression on the Transform TOP, and there is a reference arrow from constant1 to transform1.
Let me introduce another CHOP called LFO LFO CHOP. LFO stands for Low Frequency Oscillator, often used in music applications, but here we can use it to create an animated waveform. You can see how your waveform works if you connect Trail CHOP to your LFO CHOP.
Here I would like to rotate our image with this value. Select the LFO CHOP named lfo1 and select Ramp on Type. Now we have a ramp waveform varying from 0 to 1.
TouchDesigner uses angle for its rotation parameter, so we would like to have a value from 0 to 360 instead of 0 to 1. To do so, we can use a Math CHOP. A Math CHOP does arithmetic operations on channels. We use this all the time and we use value mapping here. Go to Range and put 360 on the right on To Range and now our value is mapped from 0 to 360. Now drag and drop your channel from the Math CHOP onto Rotate on the Transform TOP.
Example4: /project1/Transform_Null
Null operators
Let me introduce an operator called a NullCHOP. NullCHOP is just a placeholder. We use this all the time for referencing when we export data from one format to another.
If we're going to make reference from one operator to another and if we want to go back later and add some other filters here, we can add them before the null. If we don't do this and we just reference as we did before and then, for example, I want to add a Math CHOP to multiply it, we have to break the reference and make a new reference to the added CHOP. We would have to keep on doing that every time we added an operator, so I do encourage you to use NUll operators.
Replace input
We can go over a wire and when that wire is highlighted you can replace that wire with that connection.
Display flag on TOP
There is a display flag on TOPs. It allows us to display the TOP's output in the Network Editor's background. For example, we can compare before and after. We can use the D key as a shortcut.
Level TOP
Level TOP adjusts image contrast, brightness, gamma, black level, color range, opacity and more.
Example: /project1/Level
Edge TOP
Example: /project1/Edge
Edge TOP is similar to Photoshop's find edge function. We can change the strength and the color of the edge. We can also use the last input and composite the edge over the original input.
Composite TOP
Example1: /project1/Composition
Composite TOP performs a compositing operation for multi-inputs. It generates different results based on the Operation.
Example2: /project1/Composition_size
Besides operation, there are two important parameters in the Transform tab. Firstly, we often change the Fixed Layer. The selected input will become the fixed layer and the other input will be the overlay. The resolution and aspect ratio of the Fixed Layer is used as the composite's final resolution and aspect ratio.
Secondary, Pre-Fit Overlay. This determines how the Overlay layer (Overlay layer is the input that is NOT the Fixed Layer) fills the composite.
Example3: /project1/Composition_alternative
Composite TOP accepts multi inputs, but there are some TOPs we can use with just two inputs for specific operations. For example, there are the Multiply TOP and the Over TOP. They work the same as the Composite TOP with the same operation for two inputs.
Feedback TOP
I would like to introduce a TOP that we use quite often when we make filters on TouchDesigner. Feedback TOP is an operator that creates feedback effects in TOPs. It takes the previous frame and adds to it.
We need to composite this feedback loop back on itself so we need to make a branch from our input. Add Over TOP and we're going to composite our input over our feedback. The Over TOP is just like the Composite TOP, except the Over TOP just does one operation, so it's a simplified version and has only two inputs as opposed to the Composite TOP which has any number of inputs.
We added the feedback, but it is not feeding back right now. If we look at the Feedback TOP it requires a Target TOP. This is like saying “Where do I look to get my previous frame?” “Where am I gonna start this feedback network?” In this case the Target TOP is over1, so you can drag and drop the operator into the field. And then we will see some feedback happening.
Feedback is just going to keep drawing on top of itself over and over and over. What we can do is that we can insert other filters in this feedback network to make it do different things.
Let's insert Transform TOP here. What this will do is for every frame that adds transformation to it. For example, if we scale this down every frame that passes it's going to get smaller.
Pick numbers and effects you like and play around!
Example1: /project1/Feedback
Example2: /project1/Feedback_trail
Example3: /project1/Feedback_transform
More input: Video Device In TOP
TouchDesigner can get input from a bunch of devices via Video Device In TOP and we can get a stream from our webcam. This should work for everyone with an iMac today because you all should have a webcam. If it doesn't work for you, you can try toggling the active flag or another application might be using your webcam.
Drag down a Video Device In TOP onto the network. For Windows, choose Media Foundation for Library and Integrated Webcam for Device.
For Mac, choose AVFoundation (macOS) for Library and FaceTime HD Camera for Device.
SwitchTOP
Example1: /project1/Switch
Now we have some idea of our visuals, so I would like to add a switch between those streams. We can use Switch TOP to do this. When you take a look at the parameters for a Switch TOP, we see an index parameter. If it's 0 it shows the first input and if it's 1 it shows the second input. Most of the numbering in TouchDesigner is 0 based, it starts with 0. You might be familiar with this if you have experience with some sort of programming.
There's a little option in Switch TOP called blend between inputs. Instead of just switching it will give us a cross fade.
Example2: /project1/Switch_multi
We can connect multiple outputs to the Switch TOP , it's not limited to just two outputs. If we look at the input of the Switch TOP, it's wider than input of a Transform TOP, that means that operator accepts multiple outputs. The index corresponds to the order when they are connected, we can change order as well by clicking arrows in inputOP.
Alternatively, you can connect and disconnect multiple operators with a Switch TOP. Right mouse button and drag over the operators you want to connect, then drag to the input of Switch TOP.
Example2: /project1/Switch_multi_auto
Then we're going to make the index change automatically. We can do this in several ways, but I would like to introduce you to Count CHOP , which counts numbers. Select lfo1 and select Pulse for Type. It returns the value 1, once per second. Otherwise it returns 0. Frequency here is the cycles per second of the oscillation, so when we set it to 2, it returns the value 1, twice per second.When we set it to 0.5, it returns the value 1, once per two seconds.
Then let's connect it to Count CHOP. You should see the number is growing whenever lfo1 returns 1. We would like to have values from 0 to 4 here, so let's set a limit for the maximum value. To do that, select Loop Min/Max for Limit and put 4 on Limit Maximum.
Finally, let's connect this value to switch1. Don't forget to add a Null CHOP after count1! Now we have a loop from 0 to 4.
Example2: /project1/Switch_multi_auto_fade
User Interface
There are some useful components TouchDesigner provides to handle those values.
Example: /project1/UI_Button
If we go to the COMP tab in the OP Create Dialog we can find Button there. Drag a button to the Network Editor and if we make the viewer active, we can control this button. It can be programmed as several different types, like toggle and momentary and so on. There is a CHOP output if you look at the component and we can export 0 or 1 from this button by default.
Example: /project1/UI_Button_Lag
If we don't want the button to switch immediately, we can add a sort of delay after the button. To do that, let's put a Lag CHOP after the button and then we will see lag added to the value.
Slider
Example: /project1/UI_Slider
If we go again to the COMP tab of the OP Create Dialog we can find Slider there. Drag a Slider to the Network Editor and if you make the viewer active, we can control this slider.
Radio
Example: /project1/UI_Radio
If you go to Pallete, there are bunch of tools we can use. They are all externailzed files and like library files. We can find lots of useful tools here. Let's take a look at some UI components here.
Open Pallete browser and go to Derivative > UI > Basic Widgets. We should find buttonRadio and drag it down. You can change its labels on Button labels and name for Value on Name0. They are more customizable than SlidierCOMP and ButtonCOMP we just saw.
If you go to Palette, there are a bunch of tools we can use. It is sort of like a library of externalized files. We can find lots of useful tools here. Let's take a look at some UI components here.
Open Palette browser and go to Derivative > UI > Basic Widgets. We should find buttonRadio and drag it down. You can change its labels on Button labels and name for Value on Name0. They are more customizable than Slider COMP and Button COMP we just saw.
Other CHOPs
As we have seen, CHOPs can be used to control any parameter. I would like to introduce two types of CHOPs we often use for live performance.
MIDI
Example: /project1/MIDI
For example, I would like to control a slider with a fader on my MIDI device. We can also use a CHOP to get signals from a MIDI device. Go to CHOP, type in MIDI and there is a MIDI In CHOP. Drop it down to the network.
There might be warning on the CHOP. Let's take a look and it possibly says Could not open the MIDI interface, that means TouchDesigner doesn't recognize a MIDI device yet. We need to create a new mapping.
To do that, go to Dialogs > MIDI Device Mapper and click Create New Mapping. Then it gives you an option for In Device, Out Device and MIDI Map. Click the arrow at the right of In Device and select your device. If you move a slider on your device, you will see data coming into TouchDesigner.
Go back to your network and you will see data changing in your MIDI In CHOP. Here we see a bunch of values coming from the device, but we need to specify the signal we would like to use.
For example, we would like to use ch2ctrl22. There is a select CHOP. It simply selects one of the channels that you have in your CHOP. We can select the channel from the arrow at the right of Channel Names. We can even change channel names here.
We would like to use this value to control a value from 0 to 1 but the range of my MIDI is 0 to 127. All I have to do is go into the Math CHOP and check out the range and change it from 0 to 1 to 0 to 127 for From Range. Now I have the value from 0 to 1.
OSC
Example: /project1/OSC
Another input possibility is OSC. OSC stands for open sound control. With OSC, you can communicate with data coming from all sorts of applications. A lot of audio applications like
Resolume, Reactor, Ableton use OSC.
Here are two mobile apps we can use with OSC, so let me introduce them. The first one is an app called ZIG SIM which gives you the sensor data of everything on your phone.
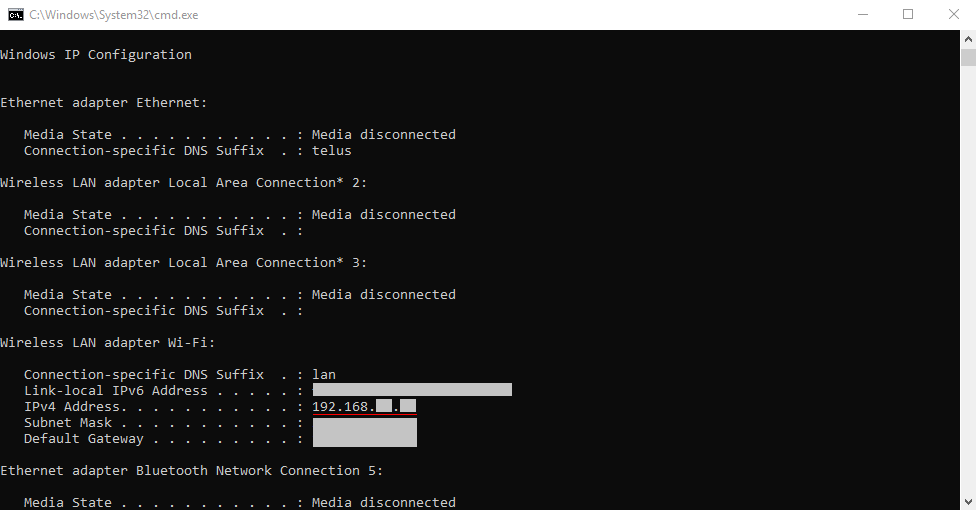
In TouchDesigner, there is an OSC In CHOP. There's a few things you have to do. Make sure the protocol is set to UDP because OSC In CHOP uses the UDP protocol. The port number on the app and the one on TouchDesigner must be the same.
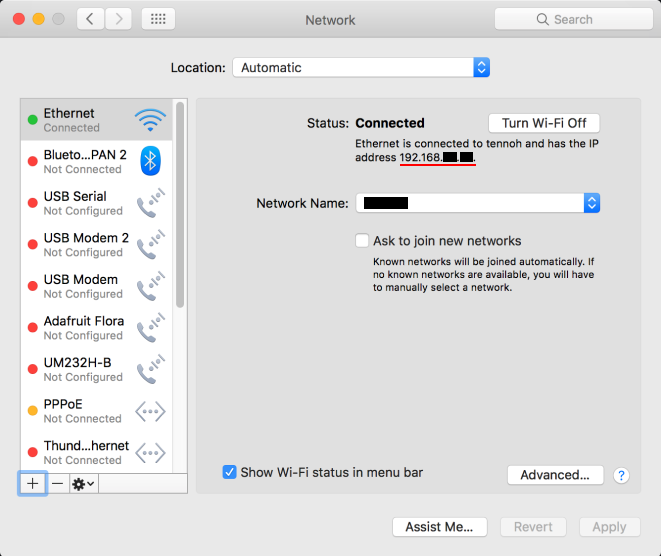
You will have to fill in the IP address. To do that, we need to find the IP address of our computer.
How to find your IP address
For Windows, open up Command Prompt and type ipconfig and hit Enter. Then find the IP address under IPv4 Address.
For Mac, go to System Preferences > Network.
Another app is TouchOSC which is often used with audio applications.
I would recommend using LAN if you're doing an installation or live performance because Wi-Fi will always screw up on you when you least expect it.
Output
We've been working on the network editor so far, but I would like to introduce how to output your images on a display.
To output our images to displays, we will need a Window COMP. But as a default you already have one called perform on root. Let's go to root and when you select perform, you'll see a parameters dialog for Window COMP. It should be looking at project1 by default.
Let's just walk down the parameters and find out how it works. If it's going to open on a single monitor, it's going to be 0 for Monitor. (In this video, I choose 1 because of my screen recording setting.)
If I select project1 and look at the Look it has Background TOP. It should be set to the TOP which is named out1 inside project1 by default.
The opening size is going to be taken automatically from its target component from here. If I select project1 and look at the layout it has Width and Height. It's 1280 and 720 by default. That's the size of the window that is going to open.
There are two types of window. If we click the button beside Open as Separate Window, we will get a floating window. But the thing with a separate window is that in Windows and Mac OS operating system anytime you open a second window there's a tons of extra overhead the GPU has to do to manage two windows. This window management will slow down your frame rate.
Another one is Open as Perform Window. If we click that, the network editor goes away and we just have this one window. To get out of this mode it's just an Esc key like you do when you are in full-screen mode of other applications. If you press F1 key you can jump into perform mode anytime.
We have a 1280 by 720 window but, for example, we have a 1920 by 1080 screen. There's a couple of ways we could deal with this.
One is just chaging Width and Height.
Another way of doing it in the window component is selecting Fill on Opening size. This is kind of handy if you don't know the resolution of whatever you're going to be outputting to, but this method doesn't work when we have multiple displays, so I would like to go with the first solution here.
We have the border on the top by default, but if I take Borders and turn it off and try it again, it should work as fullscreen.
We will work with a second display on the 3rd day, but feel free to ask me if you are interested during the lab time! You can work with the projector I'm using.
Share your visuals with me!
We've worked on a single display today, but TouchDesigner has features that allow you to share your textures with other computers via network. Let me introduce some of them.
Touch In / Touch Out TOP
The easiest option if you’re working between TouchDesigner apps on different computers is Touch In TOP and Touch Out TOP.
First of all, make sure we're on the same network, then let's add Touch Out TOP. We also need to add Touch In TOP on TouchDesigner on another computer.
For Network Port on both, we need to have the same TCP/IP port number here. The number can be any number from 1 to 65535 and make sure the ports you choose are not already in use.
For Computer Name / IP on Touch In TOP, we need to specify the IP address of the computer with the transmitting Touch Out TOP. Use localhost to reference the local machine.
Syphon Spout In TOP / Syphon Spout Out TOP
You might be familiar with Syphon and Spout. Syphon Spout In TOP will obtain its texture image via shared memory from other applications. Lots of visual applications, such as Unity, UE4, Processing, openFrameworks, vvvv, Resolume, VDMX, MadMapper, etc. Of course we can send it out to other applications, too. Here is an example with MadMapper.
Same as OSC, highly recommended to use cabled network instead of Wi-fi.
Open Lab time!
For lab time today, I would like everyone to play around and make some cool effects from what we have learned! And then share your work via TouchOut and we would like to check them out together at the end.
References
- Introduction to TouchDesigner - Ben Voigt - YouTube
- Introduction · Introduction to TouchDesigner
- 映像音響処理概説 2019
- Texture Sharing with TouchDesigner - elburz.io
- 2.5 Transform TOP - Minimalistic Animation in TouchDesigner - YouTube
- Feedback Techniques (English / 日本語) - YouTube
- VJ LOOPS | BEEPLE | the work of mike winkelmann
Question about the workshop?
Feel free to contact me. I am also available to run other TouchDesigner workshops either online or offline.
- chimanaco (at) gmail.com
- Instagram @chimanaco
For the attendees of this workshop, post your question in the Slack channel I invited you to so that anyone in the workshop can obtain benefits from your question.