In this course, we will learn how to use TouchDesigner together. Let’s have fun!
Sample File
chimanaco/takara-univ-media-programming-2021
The directory we are using today is “01.”
Course Overview and Objectives (from the syllabus)
Learn how to program with various types of media, using a node based visual programming language environment TouchDesigner. Learn about programming languages that are also widely used outside of TouchDesigner, such as Python and GLSL. By learning the basics of the software, build an ability to continue learning individually after completing this course.
About the Instructor
Yasushi Harada
Engineer/Technical Director, space production team huez, SHIBUCITY inc.
Producer/Director of a creative community TDSW
. After graduating from Waseda University with a BA in Psychology, Yasushi has worked on art installations and live visuals for events and museums as well as web design and development at creative agencies in Japan and Canada.
What is TouchDesigner?
TouchDesigner is a node based visual programming language environment widely used for live shows, projection mapping, experimental design, interactive installation and so on. The software is developed by Derivative based on Toronto, Canada.
Each node, or Operator in TouchDesigner, performs a specific, small, and granular action. However, you can create something very complicated using these small building blocks. Unlike traditional programming, you can program visually by wiring these small blocks together.
One powerful feature of TouchDesigner is that everything works in real-time. As soon as you connect its nodes, you will see the result immediately without having to compile code or render an animation. This is a really powerful and fun part of TouchDesigner.
Sometimes, you might need to spend a lot of time making what you want because it might not be something out of the box. However, it’s really fun building your own tools!
In addition to this node based programming, if you are good at GLSL, Python and C++, the possibilities are infinite. I would say you can make almost anything because TouchDesigner allows you to customize your projects with those languages.
Showcases
Projection mapping
Lighting installation

Controlling device

A/V performance
If you want to see more, visit About TouchDesigner / 事例|Toyoshi Morioka|note (written in Japanese). This page has some very good examples.
About the License
Based on Download | Derivative
| License Type | Price | Summary |
|---|---|---|
| NON-COMMERCIAL | Free | Personal use only. Resolution limited to 1280x1280. |
| Commercial | From $600 USD | Can be used commercially. Resolution not limited. More features available. |
| Educational | From $300 USD | For educational use only and cannot be used commercially. Other than that, all features are same as the Commercial license. |
| Pro | From $2200 USD | Advanced features available. Files can be password protected. Professional support by Derivative available. |
For this course, we are using Non-commercial version.
If you purchase a license, you can update your builds for one year. This may sound a bit complicated, but it means you can use builds that are released within one year from your purchase. After the year, you won’t be able to use builds that are released from then on, but you can keep using TouchDesigner itself. If you want to use new builds, you can update your license and then you can use new builds that are released within one year again. Updating a license costs 50% of the license purchase.
About Builds
TouchDesigner is being developed daily and new builds (compiled program that you can run) is being released. As of April 20, 2021, the latest version of the Official build is 2021.12380. There are 2 types of builds, Official and Experimental. Official is a version that is more stable, and Experimental includes various experimental features as it is named. Experimental is fun to use, but also more likely to have bugs, so if you want to use TouchDesigner in a more stable environment, I would recommend using the Official one. For this course we will use the Official build.
Downloading & Installing
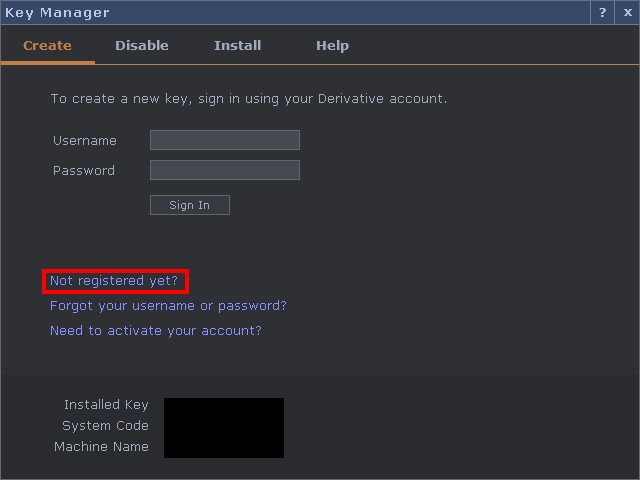
For this course, basically we will be using the school’s PCs. But if possible, please try installing and using TouchDesigner on your own PC. In order to use TouchDesigner, you need to create a user account on Derivative’s website, and install a key.
When key is not installed, you see a screen like this when you first launch TouchDesigner, so click Not registered yet?
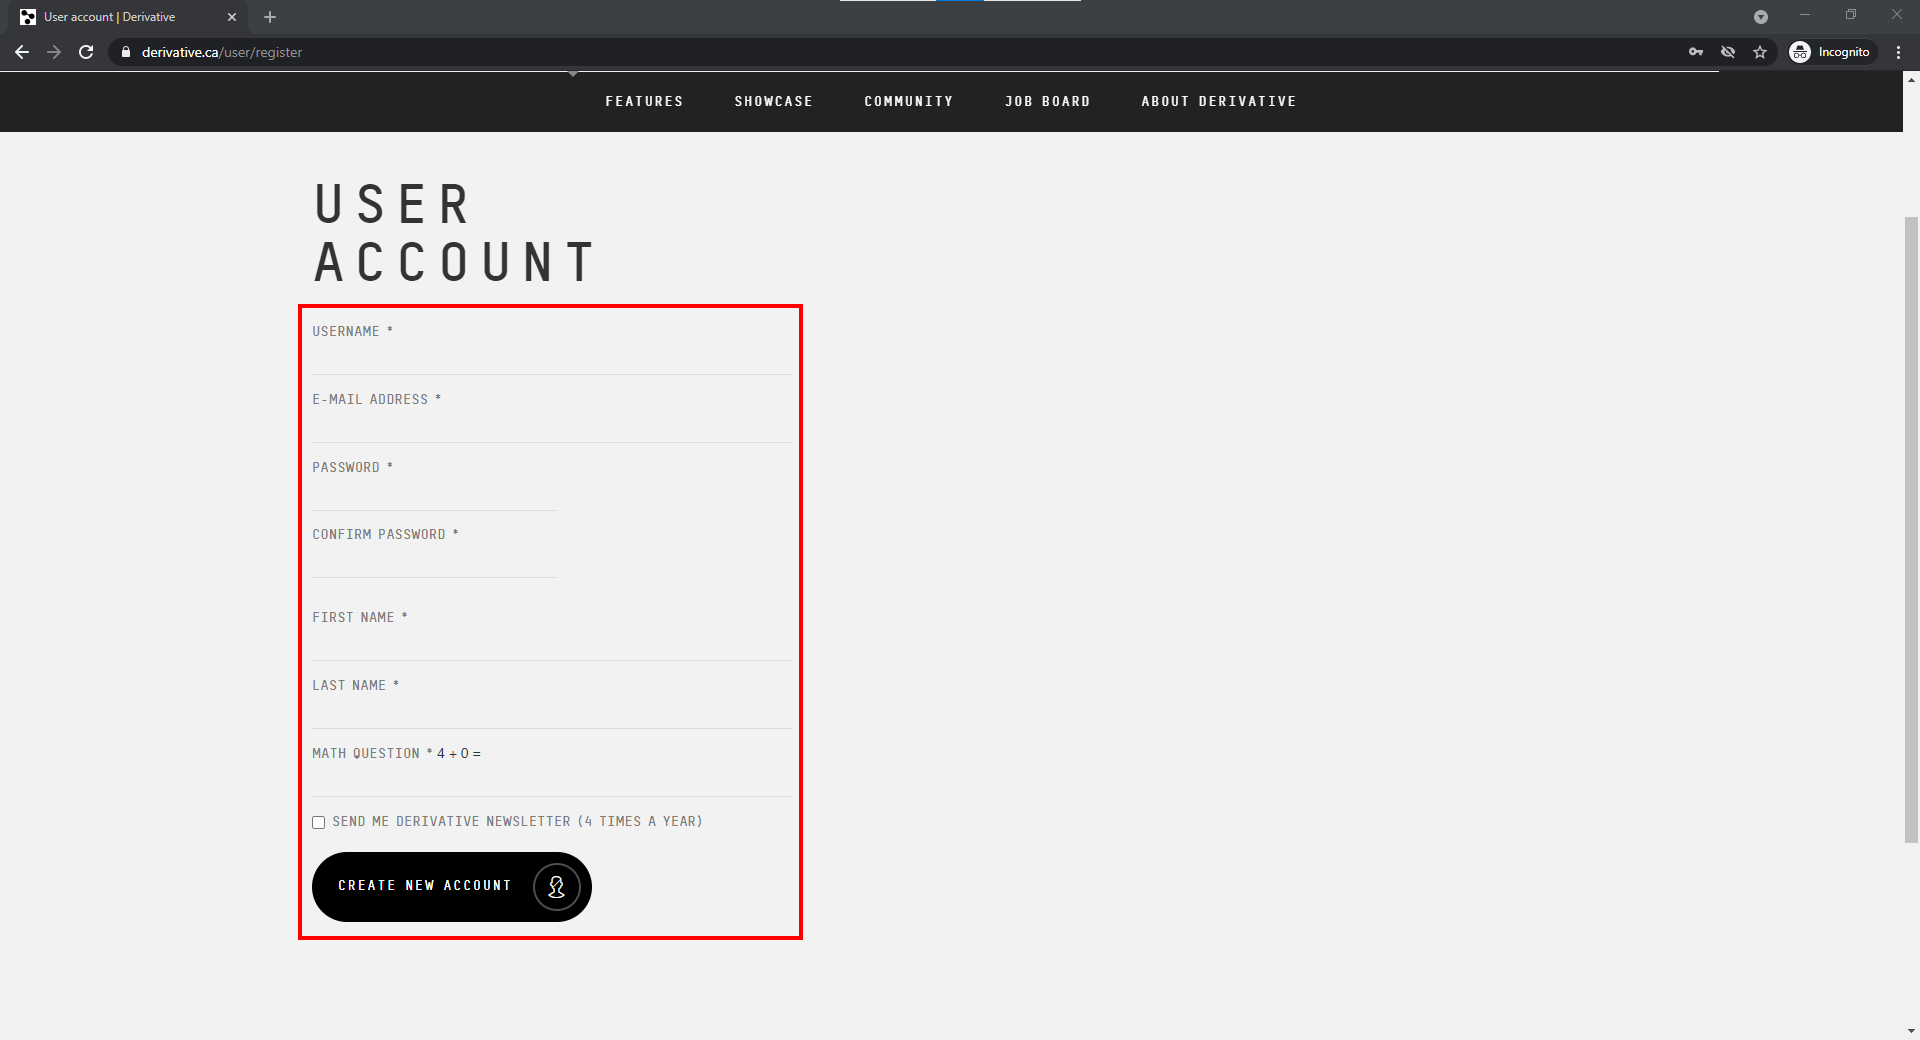
The user registration screen opens on your browser, so complete all the necessary information and click CREATE NEW ACCOUNT.
When you receive an email from Derivative to the email address you registered, the registration process is complete. Go back to TouchDesigner and enter Username and Password you created, then click Sign In.
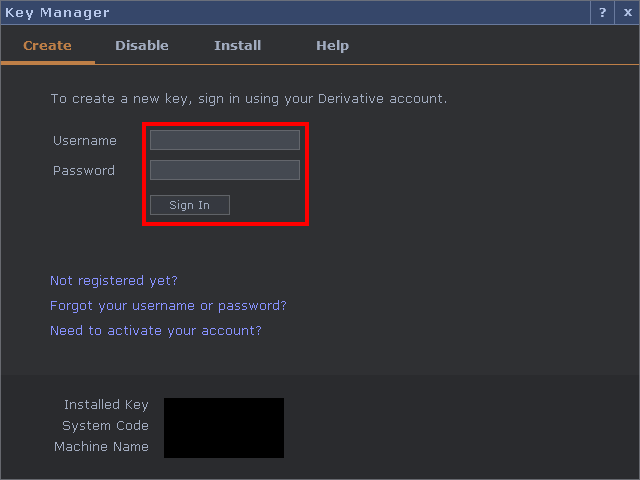
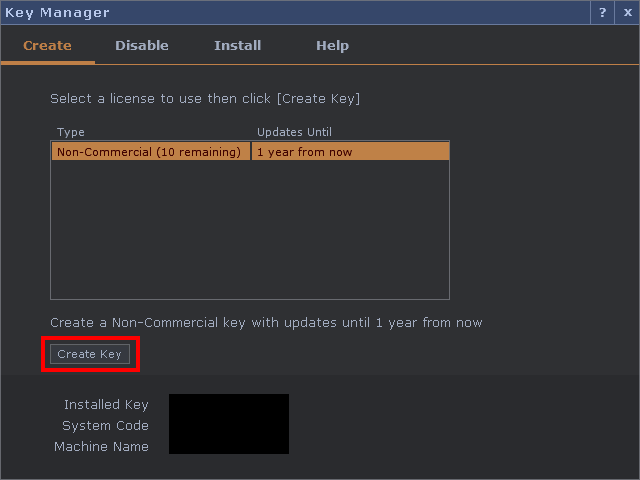
You move on to a screen where you install your key. Click Create Key, and this dialog box disappears. Now you can use TouchDesigner.
Network editor
Let’s look at TouchDesigner screens.
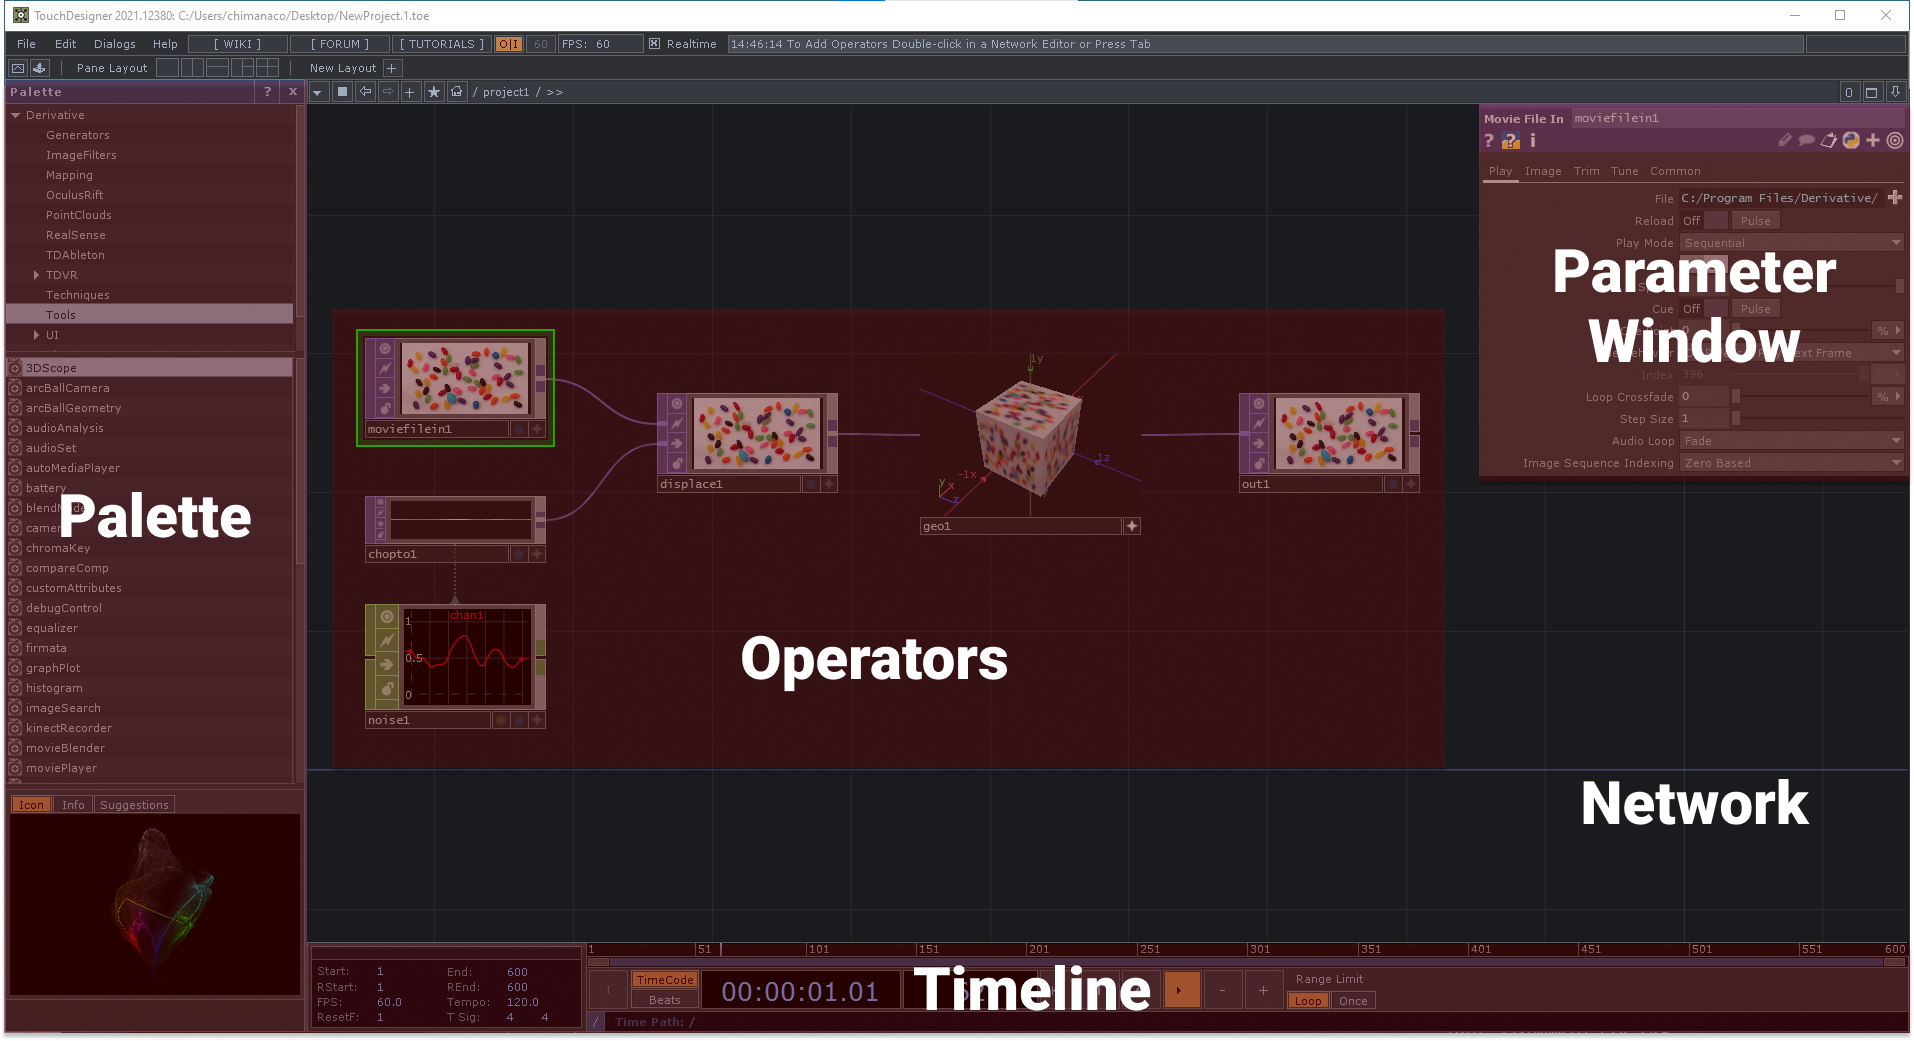
This is our workspace. We call this the Network Editor. Let’s see how we move around the editor.
Use the left mouse button to drag around. You can move around the space. It is an infinite canvas so you can keep on moving and building your network.
You can zoom by holding down the middle mouse button and moving the mouse left and right. If you don’t have a middle mouse button, you can use the alt key (option on a Mac) and right mouse button which will substitute for the middle mouse button.
To move an operator, you can just select one with the left mouse button and drag it. You can select multiple operators by holding down the shift key, selecting another one and then dragging them around. You can also do box-selecting with the left mouse button by holding down shift key. The right mouse button also gives you a box select.
In a TouchDesigner network, the data flows from left to right. If you see the wires connecting operators are animated, that means there is some data flowing. If you don’t see animated wires and things aren’t working for you, the timeline might be paused. This happens a lot because the space bar is the hotkey for pausing the timeline. If you happen to hit the space bar you’ll pause your timeline and you will see data is not travelling through the wires and things won’t be updating for you. If something is not working for you, double check that the timeline is playing. Just click the play button on the bottom or the space bar again, that should get it working.
There is also a way of scrolling in and out of components with the scroll wheel. If you scroll out with your scroll wheel, eventually you’re going to go out of that component to an upper level. You can also use the scroll wheel to dive into the component. Just put the mouse on the component and scroll in and you will eventually zoom into the network inside of that component. If you double-click on a component, that will take you directly inside that component.
There are keyboard shortcuts for these. Press the U key if you want to go to an upper level and the I key to go to an inner level.
If you press the H key, it will “home” your network and you’ll see your entire network at once. If you press the H key with shift, it will home your network with a focus on your selected operator.
Operators
There are 5 types of operators and components in TouchDesigner. These are classified as shown in the table below. Applications are created by combining these operators.
| family | meaning | how it works |
|---|---|---|
| COMP | Component | Used to create 3D objects, UI, etc. Retract other operators. |
| TOP | Texture Operator | Used to create 2D images and videos. |
| CHOP | Channel Operator | Use numbers. Digitize and process movements, sound, communication between other devices and so on. |
| SOP | Surface Operator | Used to create 3D shapes. |
| MAT | Material Operator | Used to create 3D surfaces. |
| DAT | Data Operator | Used for texts and scripts and communications with databases or other external communications. |
Let’s try using operators.
Remove all default operators
Before playing around, let’s delete all operators in the Network Editor and add a brand new operator. We’re going to use it to add video. To select all operators, you can use the Ctrl + A keys and hit the Del key to delete them.
How to add an operator
To add a new operator, you can open the OP Create Dialog by double-clicking anywhere in the Network Editor’s open space. That’ll show you a bunch of different operators. Also the tab key is a shortcut to bringing up the OP Create Dialog.
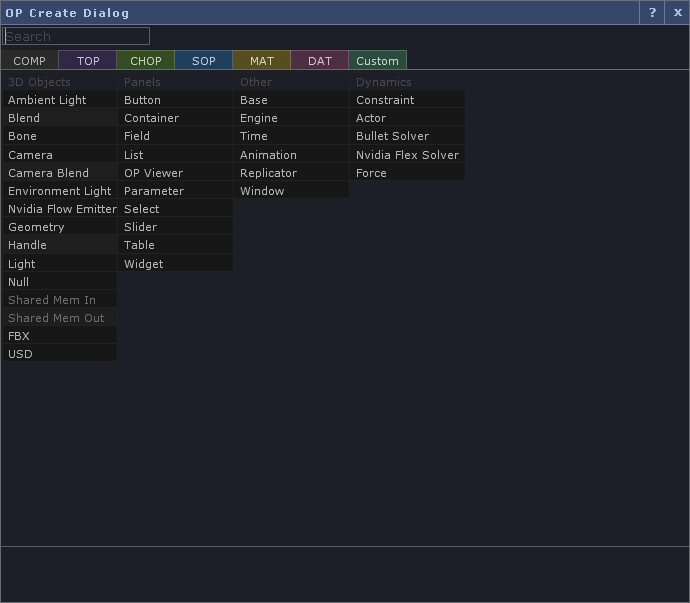
The operators are separated into different families. Each family deals with different types of data. You can change family tabs by hitting the tab key once the dialog is open.
Add a Movie File In TOP
There are lots of operators and sometimes it’s hard to find what you’d like to add. When you open the OP Create Dialog you’ll find a little search field at the top. If you type what you are looking for, it just highlights that. We want to use an operator called Movie File In TOP
to play our video, so let’s type Movie and Movie File In TOP should be highlighted. If you find it, click and drag it to the network.
Now we have a Movie File In TOP in our network editor. This is the operator for loading an image or playing a movie. Whenever you select an operator, you should see parameters for that operator highlighted at the top right of the Network Editor in the Parameter window. If you don’t see these parameters on the right, the hotkey for this is P and you can just toggle it on and off.
In the Movie File In TOP, click the plus button to the far right of File. This will open a file browser on your OS. Find your video file and select it. It should start playing your video!
Transform TOP
Let’s connect another operator to our video. I would like to introduce the Transform TOP that is used for 2D transformation like translate, scale and rotate.
Connect and disconnect operators
If you left mouse button on the output connector of an operator and you get close to a valid input connector on another operator, it will kind of have a little magnetic snap and you can connect it.
Instead of adding a new operator and then connecting it, you can right-click on the output of any operator, select a node from the Op Create Dialog and it’ll be automatically wired. You can also insert an operator between operators by right-clicking the wire between them. It will bring up the little menu and you simply choose Insert operator.
You can also disconnect operators if you choose Disconnect on the little menu. Another way to do that is clicking on an input and take the wire out into space and just click somewhere and it’ll disconnect.
Transform: /project1/Transform
Add Transform TOP from the dialog and drop it down. You should see a parameters window on the top right. Let’s take a look at translate. The left is for x and the right for y. By default, 0 means no movement, and if you enter 1, this TOP moves to the right for 100%.
Value ladder
You can type in any number you want but it’s not an interactive way of working. TouchDesigner has something called a value ladder when you’re working with parameters. If you hold down the left mouse button on a numeric parameter, you will see a dialog popup with 5 or 3 different numbers, each using different increments. Whichever increment you choose, it’s going to adjust the parameter by that increment. Let’s say we just go with .1 in the middle. Once I Select the increment, if I start moving left and right it’s going to adjust the parameter in .1 increments. If we like to go down to .01 and go left and right now we’re going to adjust it in .01 increments. This is the way that we can find a sweet spot with parameters or quickly adjust any numeric parameter.
Another trick with adjusting parameters is that sometimes you see two or three parameters and you want to adjust all at the same time by the same amount. Instead of adjusting both separately, if you hold down the left mouse button on the name itself, you can adjust both of them at the same time. This is handy for scaling in XY at the same time. We can also use this for 3D, for example, scaling a sphere in all XYZ.
A Transform TOP can also create a pattern easily. Go to the Tile tab and choose Repeat for extend on the parameter dialog. Head back to the Transform tab and try tweaking values on Scale.
Transform with Python: /project1/Transform_Python
We can use Python expression on parameters. To make a simple animation, we often use absolute time. We can express seconds and frames as below.
absTime.seconds absTime.frame These are TouchDesigner specific, but we can also use lots of python features. For example, a mathematical function in python.
math.cos(absTime.seconds * 2) * 0.25 math.sin(absTime.seconds * 2) * 0.25 Circle & Rectangle: /project1/Circle_Rectangle
You can draw a 2D circle using Circle TOP. It is called “Circle” but it’s a n-sided polygon with many vertices. So if you set Polygon as ON and Sides as 3, you can create a triangle.
You can use Circle TOP to draw a 2D square, but you can use Rectangle TOP to do so, too.
In TouchDesigner, you use RGB to specify the color.
Tile: /project1/Tile
You can use Tile TOP to reverse or change the position when tiling.
Changing resolution: /project1/Resolution
When changing resolution in TOP, go to Common tab > Resolution and change the value of wh.
Export an image: /project1/SaveImage
There are various ways to safe an image on TouchDesigner, and here is a simple way. Click RMB on TOP, select Save Image, then select the file format and the name and save it. Today, we’re using the png format.
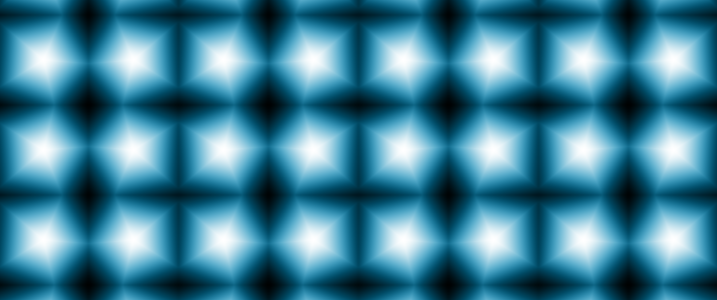
Example of a pattern: /project1/Examples
This is a sample of a pattern that I created.
Today’s assignment: Create a pattern
Create a pattern using Movie File In TOP, Circle TOP, Rectangle TOP, Transform TOP, Tile TOP and so on. Export an image and submit via Teams.